This is a PK50 FL2. This is the designation in Portugal, but it differs in other countries (in Germany for example it is called PK50 XLS). The model number, which is the same anywhere, is V5S2T
In fact I've started it around 5 years ago, and then left it aside before it was finished so now I'll have a lot more work.
Here's some photos of the vespa as I bought it.


Here's a list of what I am going to do to this machine:
1 - Refurbish the engine (all new bearings, oil seals and gaskets)
2 - Increase power by changing the 50cc engine head to a 75cc or 85cc (in the process of deciding)
3 - New paint (when I first started I've painted it british racing green, but I'm changing to black again)
4 - New seat cover (the one it has now is totally finished)
5 - Front weel hub refurbishment (new brakes, new bearings, new look)
6 - Rear weel hub refurbishment (new brakes, new bearings, new look)
7 - All new lights (front light, tail light, blinkers)
8 - Get all the missing or broken parts (front weel cover, handle bar cover)
9 - Mend the electrical system
10 - Anything else that comes along (believe me, there are stuff I'm not seeing that I will need to take care of)
Let's get started then...
Disassemble
I've started with the seat. It is attached by 4 screws (two of them also hold the gas tank as well)
Next I did the gas tank itself, to gain access to the carburator and rear suspension bolt.
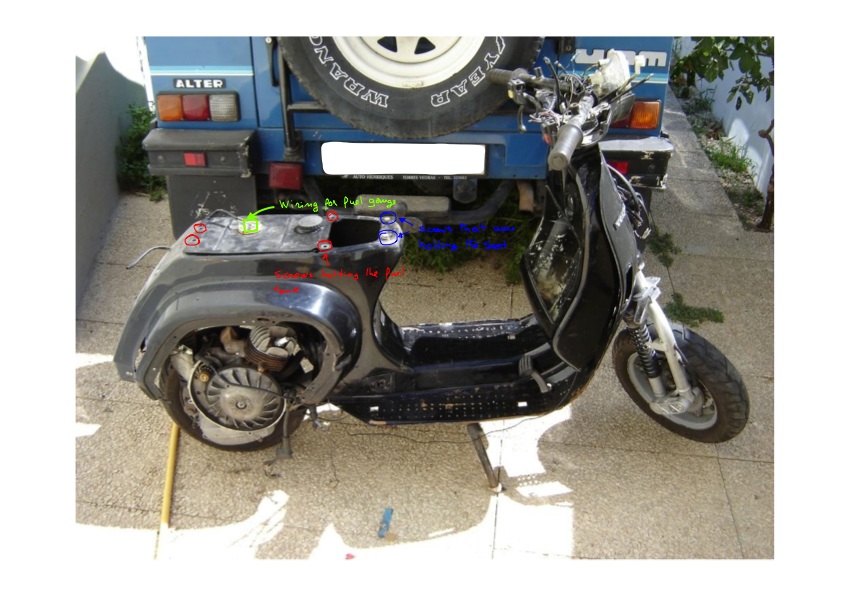
In the next picture you can see the rear suspension bolt. It has a small pin the keeps this bolt from unscrewing itself. Be very carefull when reassembling, and be sure to put a new pin in place of the old one. If you don't, you can kill yourself when driving this incredible machine because the rear suspension may detach itself from the rest of the bike.

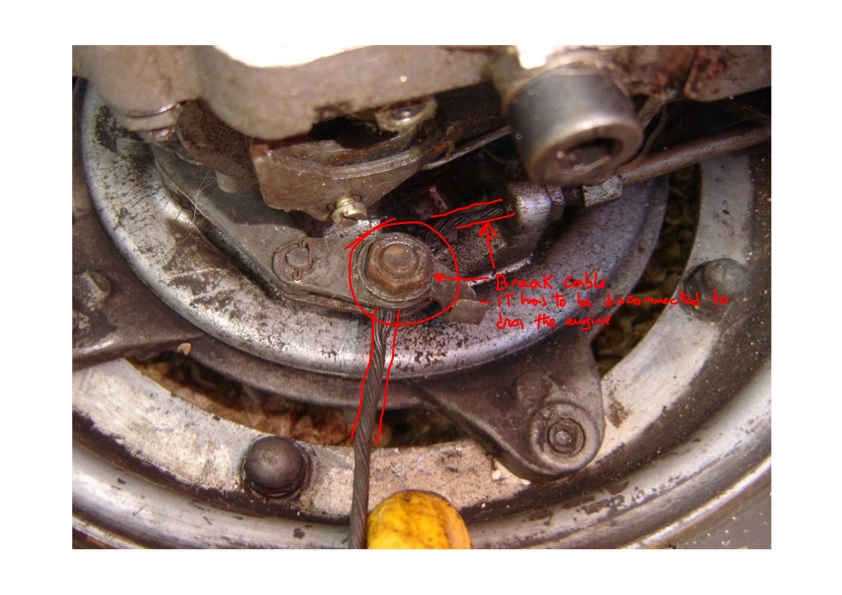
To do that, you need to disconnect all the cables (clutch, rear brakes, gear shifter) as well as the carburator.
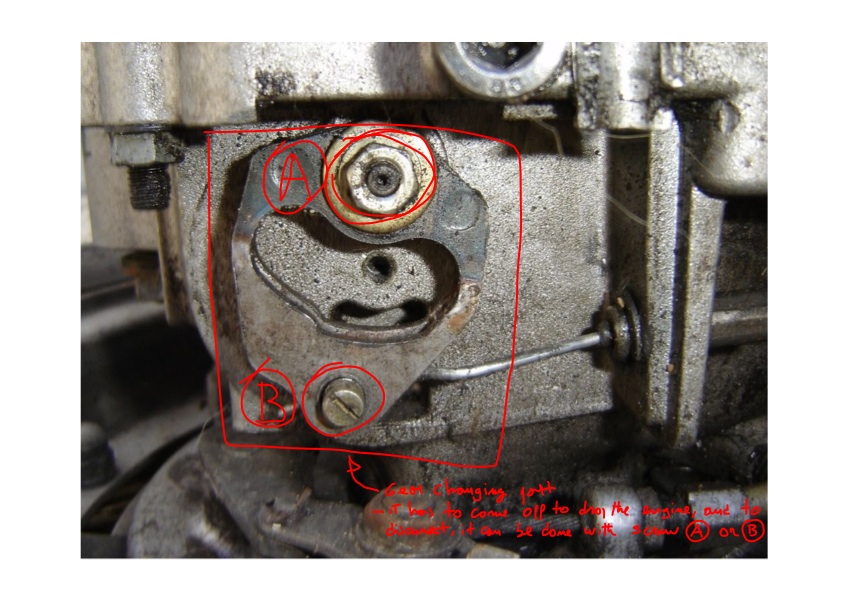
Next you just take the central pin which is a big screw that runs from one side to the other of the bike, through the engine casing
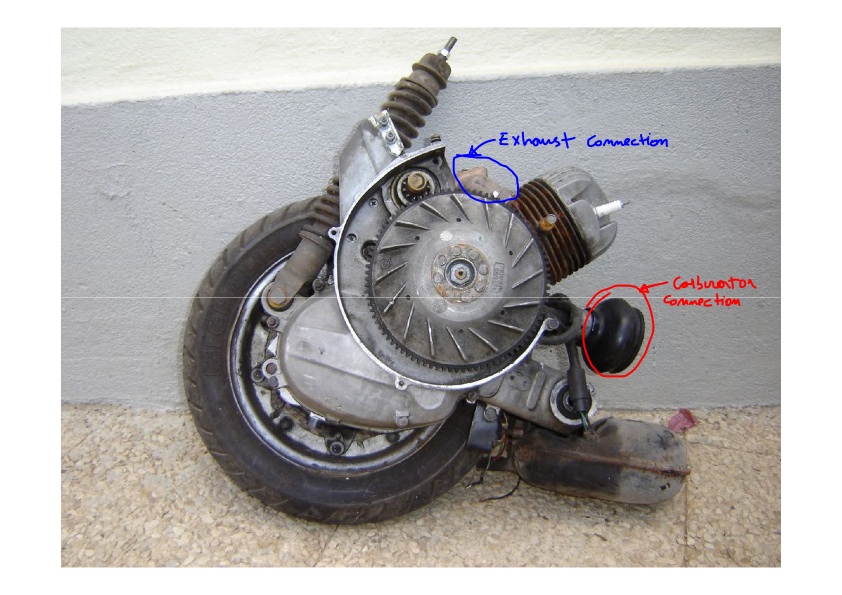
And here it is our engine separated from the frame. Next stop it will be a full refurbishment of this piece, as
well as an upgrade for 85cc (I've decided already).
So, i've got all the parts I need for the engine, including a very nice 85cc kit. I spent the most part of two days disassembling completely the whole engine, and at this point what I have is a box full of parts.
I've started with disassembling the rear weel. Took off the rim with the tire, and it was time to open the back hub. That is done by removing the assembly you can see in the next set of photos (the first is what you get after prying out the plastic cover)

It has a small pin that goes through the axel, and keeps in place one nut cover. This is design to guarantee that you won't loose the weel while driving, so be sure to reassemble everything correctly. Most people advise to replace the pin when reassembling, and I think you should.
Notice the way its ends are bent backwards.
Now you can access the central nut that is holding the whole thing toghether (here's a view of the entire assembly).

The nut may offer some resistance, but nothing a bit of heat can't solve.
Make sure not to loose the big metalic ring that sits under the main bolt.

Now you're all set to access the insides of the rear weel, and the next photo shows what youll find.

Make sure no oil at all gets in this part, otherwise the next time you try to brake you're in for a very painfull surprise!
Now that we are inside the weel hub, let's get it in bits.
First you need to take out both circlips that keep the brake pads in place.

To remove them from the hub, I read somewhere that you sould start by pulling the circlip side of one and then move to the other, but I've taken the circlips, loosened the spring first and only then took the pads out.
The next image shows what you'll get. And to take that out, you need to undo the three nuts I'm showing in the picture below.

After that you'll have separated the rear weel hub from the engine casing, and you get two pieces:


Now you should also take out the brake lever. Just push it through the hole, gently. NO HAMMERING. It should come out realy easy.


While you're at it, you can also disassemble the gear shift lever. All it takes is to undo a bolt and it will be out. You may need to giggle it a bit but don't force anything!

After that is done, I've decided to disassemble all the small bits and pieces connected to the engine block.
Here's the intake manifold


and the exhaust manifold


Remember that all these parts have gaskets where they connecto to each other, and that all gaskets should be replaced.
Before reassembly, you should clean very well the insides of these "pipes". This is a small capacity 2 stroke engine, and these are affected by everything that influences the intake and the exhaust.
On the other hand, you should also be aware that any rust of dust left inside the intake will, sooner or later, end up inside the cylinder, and that is not a good thing for your engine or your wallet...
Lets now get into the clutch and clutch cover.

You take the clutch cover out by unscrewing the 6 screws marked with red circles above, but be careful because they're not all the same! You'll need to remember this when reassembling...
Check the next photo

After unscrewing these screws, just pull the lid (nothing else is attached) and you'll see something like the next photo.
Be sure not to drop anything inside this part now, otherwise you will absolutely need to dismantle the rest of the engine block to get it out!

First things first, start by taking out the primary (signaled in red in the photo above). You'll need to undo the nut, and be very carefull not to loose the very small half moon piece that is used to locate the primary in the axle.
It will be extremely tough to unscrew, especially because the whole engine will want to spin. The way I solved it was by putting a soft metal piece (1 euro cent coin) between the teeth of both wheels. I don't reccomend you do the same becaus it may ruin the parts!
After that, lets address the clutch. Start by gently undoing the clip marked yellow in the picture above, and the centre of the clutch will come out (the part marked blue).
The next step is to undo the clutch bolt:

To get the clutch out you'll need a "small frame vespa clutch puller". I don't have photos at hand, but I'll try to take some.
You screw this tool on the place the clutch nut was, and make sure it is very tightly screwed! If it is not it may ruin the threads of the part itself and you'll never get the clutch out!!!
Then just screw the tool's inner screw while holding its main body with a wrench and you get the clutch out.
On the other hand you should have the clutch cover, which contains the clutch lever attached

To take the lever out, just detach the outer spring (bottom left corner) and GENTLY and without wiggling it pul the lever out.
BE VERY CAREFUL because there are some small rollers inside it where the clutch lever fits. Make sure you won't loose them!
Thanks man. This is great stuff!
ReplyDeleteExcelente trabalho de ajuda e divulgação. Acabo de comprar uma FL2 e tenho de começar por algum lado :) Obrigado.
ReplyDeletemais?
ReplyDelete